我们通过一个案例来演示SpringBoot整合MyBatis和SpringMVC
该案例通过前后端分离来完成,前端使用vue2加JavaScript实现
前端部分
主要代码
1
2
3
4
5
6
7
8
9
10
11
12
13
14
15
16
17
18
19
20
21
22
23
24
25
26
27
28
29
30
31
32
33
34
35
36
37
38
39
40
41
42
43
44
45
46
47
48
49
50
51
52
53
54
55
56
57
58
59
60
61
62
63
64
65
66
67
68
69
70
71
72
73
74
75
76
| <template>
<div>
<!-- <input type="button" value="获取远程数据" @click="sendReq()"> -->
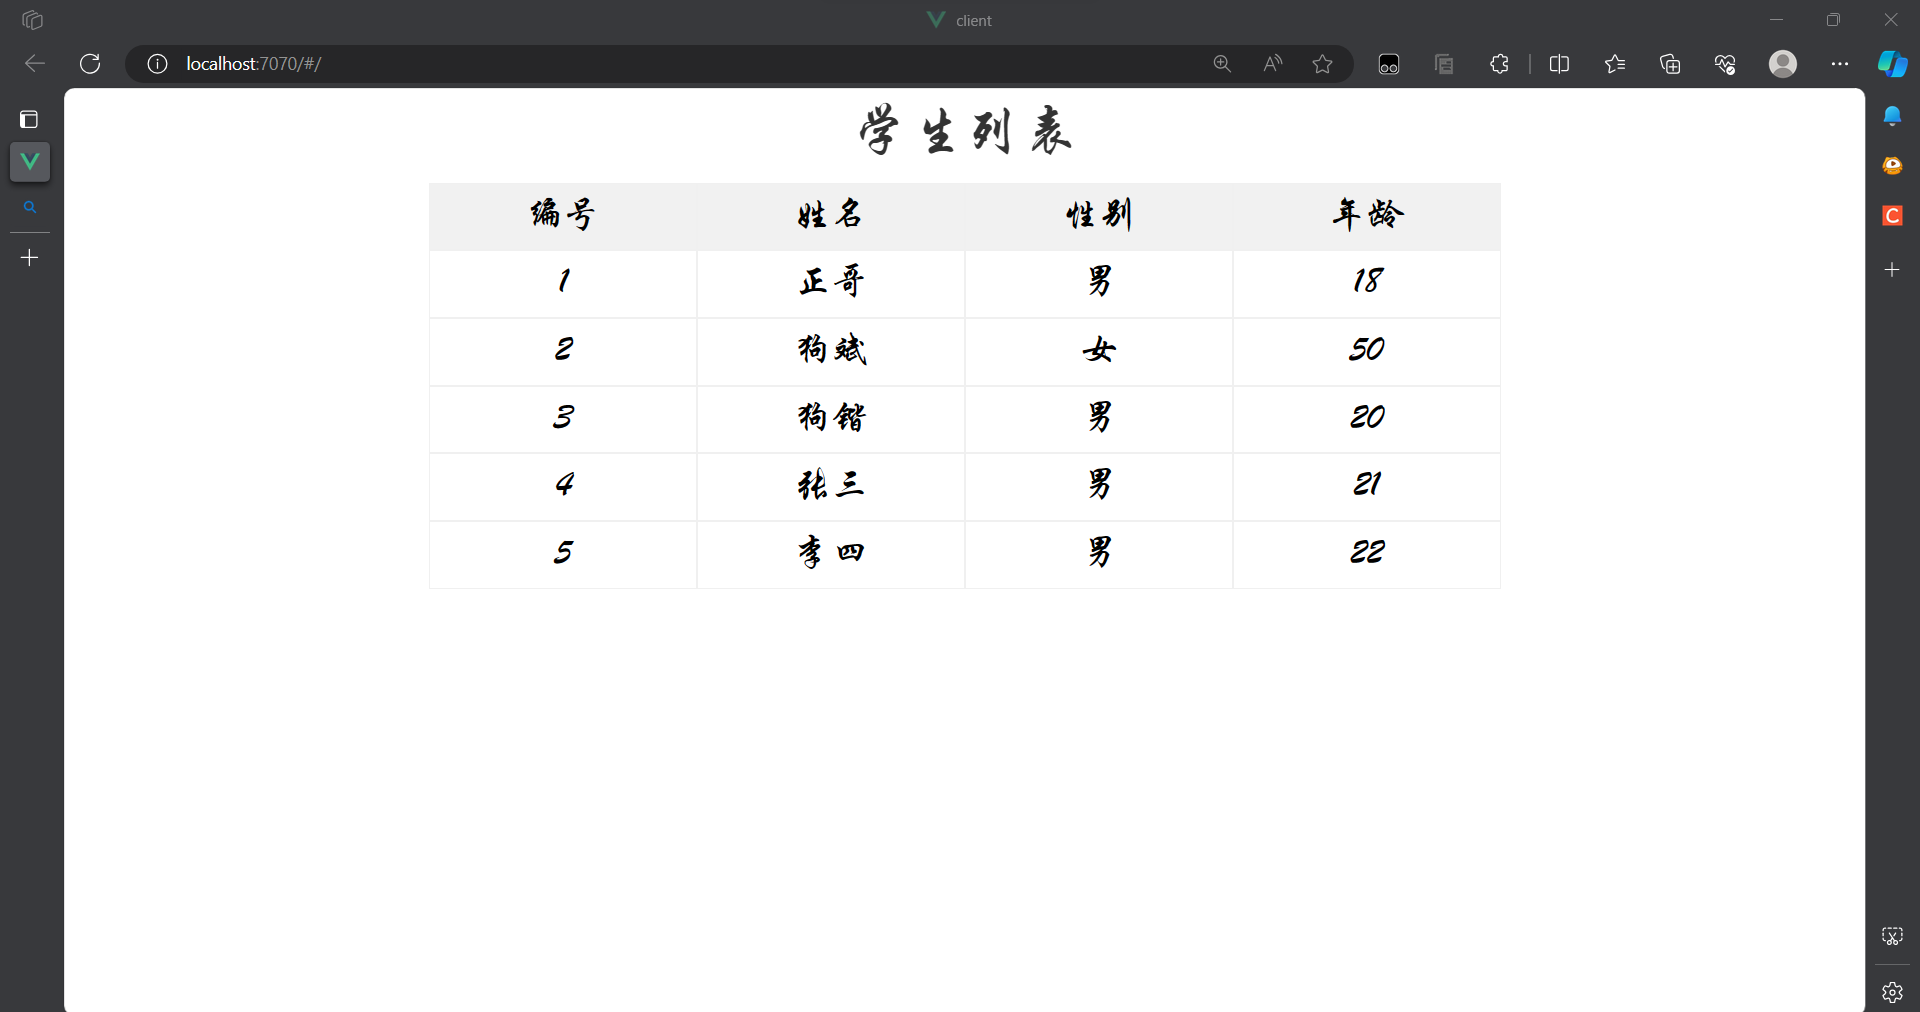
<div class="title">学生列表</div>
<div class="thead">
<div class="row bold">
<div class="col">编号</div>
<div class="col">姓名</div>
<div class="col">性别</div>
<div class="col">年龄</div>
</div>
</div>
<div class="tbody">
<div v-if="students.length > 0">
<div class="row" v-for="stu in students" :key="stu.id">
<div class="col">{{stu.id }}</div>
<div class="col">{{stu.name }}</div>
<div class="col">{{stu.sex }}</div>
<div class="col">{{stu.age}}</div>
</div>
</div>
</div>
</div>
</template>
<script>
import axios from '../utils/myaxios'
const options = {
mounted: function(){
this.sendReq()
},
data: function() {
return {
students: []
};
},
methods: {
async sendReq() {
const resp = await axios.get("/api/students");
console.log(resp.data);
this.students = resp.data.data;
}
}
};
export default options;
</script>
<style scoped>
div {
font-family: 华文行楷;
font-size: 20px;
}
.title {
margin-bottom: 10px;
font-size: 30px;
color: #333;
text-align: center;
}
.row {
background-color: #fff;
display: flex;
justify-content: center;
}
.col {
border: 1px solid #f0f0f0;
width: 15%;
height: 35px;
text-align: center;
line-height: 35px;
}
.bold .col {
background-color: #f1f1f1;
}
</style>
|
v-if:条件渲染指令,根据表达式的值来动态控制元素的显示或隐藏, 当表达式中的值为true时,其里面的内容才会展现出来
v-else:条件渲染指令,当v-if中表达式的值为false时,其里面的内容才会展现出来,v-else需要和v-if搭配使用,不能单独存在
v-for:列表渲染指令,类似于Java中的foreach
- key:key属性主要用在Vue的虚拟DOM算法,在新旧nodes对比时辨识VNodes。如果不使用key,Vue会使用一种最大限度减少动态元素并且尽可能的尝试就地修改/复用相同类型元素的算法;而使用key时,它会基于key的变化重新排列元素顺序,并且会移除/销毁key不存在的元素
import axios from ‘../utils/myaxios’ :这里的myaxios是自定义的axios
mounted:生命周期钩子函数,或自动执行其中的内容
- 在Vue实例被挂载到真实的DOM元素后被调用
- 仅触发一次
- 应用场景:执行异步操作、注册事件监听器、调用第三方库或插件、执行其它初始化操作
const resp = await axios.get(“/api/students”):像后端发送get请求并获取数据
this.students = resp.data.data:把后端返回的对象中的数据获取到
自定义axios.js
1
2
3
4
5
6
7
8
9
10
11
12
13
14
15
16
17
18
19
20
21
22
23
24
25
26
27
28
29
30
31
32
33
34
35
36
| import axios from 'axios'
const _axios = axios.create({
withCredentials: true
});
_axios.interceptors.request.use(
function(config) {
config.headers = {
Authorization: 'aaa.bbb.ccc'
}
return config;
},
function(error) {
return Promise.reject(error);
}
);
_axios.interceptors.response.use(
function(response) {
return response;
},
function(error) {
if (error.response.status === 400) {
console.log('请求参数不正确');
return Promise.resolve(400);
} else if (error.response.status === 401) {
console.log('跳转至登录页面');
return Promise.resolve(401);
} else if (error.response.status === 404) {
console.log('资源未找到');
return Promise.resolve(404);
}
return Promise.reject(error);
}
);
export default _axios;
|
配置文件vue.config.js
1
2
3
4
5
6
7
8
9
10
11
12
13
| const { defineConfig } = require('@vue/cli-service')
module.exports = defineConfig({
transpileDependencies: true,
devServer: {
port: 7070,
proxy: {
'/api': {
target: 'http://localhost:8080',
changeOrigin: true
}
}
}
})
|
在这里配置的端口号和统一的URL前缀映射
后端部分
POM文件
1
2
3
4
5
6
7
8
9
10
11
12
13
14
15
16
17
18
19
20
21
22
23
24
25
26
27
28
29
30
31
32
33
34
35
36
37
38
39
40
41
42
43
44
45
46
47
48
49
50
51
52
53
54
55
56
57
58
59
60
61
62
63
64
65
66
67
68
69
| <?xml version="1.0" encoding="UTF-8"?>
<project xmlns="http://maven.apache.org/POM/4.0.0" xmlns:xsi="http://www.w3.org/2001/XMLSchema-instance"
xsi:schemaLocation="http://maven.apache.org/POM/4.0.0 https://maven.apache.org/xsd/maven-4.0.0.xsd">
<modelVersion>4.0.0</modelVersion>
<parent>
<groupId>org.springframework.boot</groupId>
<artifactId>spring-boot-starter-parent</artifactId>
<version>2.4.5</version>
<relativePath/>
</parent>
<groupId>com.example</groupId>
<artifactId>demo</artifactId>
<version>0.0.1-SNAPSHOT</version>
<name>demo</name>
<description>Demo project for Spring Boot</description>
<properties>
<java.version>1.8</java.version>
</properties>
<dependencies>
<dependency>
<groupId>org.springframework.boot</groupId>
<artifactId>spring-boot-starter-web</artifactId>
</dependency>
<dependency>
<groupId>org.mybatis.spring.boot</groupId>
<artifactId>mybatis-spring-boot-starter</artifactId>
<version>2.2.0</version>
</dependency>
<dependency>
<groupId>com.mysql</groupId>
<artifactId>mysql-connector-j</artifactId>
<version>8.0.32</version>
<scope>runtime</scope>
</dependency>
<dependency>
<groupId>org.springframework.boot</groupId>
<artifactId>spring-boot-starter-test</artifactId>
<scope>test</scope>
</dependency>
<dependency>
<groupId>org.projectlombok</groupId>
<artifactId>lombok</artifactId>
<version>1.18.28</version>
</dependency>
<dependency>
<groupId>junit</groupId>
<artifactId>junit</artifactId>
<version>4.13.2</version>
</dependency>
<dependency>
<groupId>org.springframework.boot</groupId>
<artifactId>spring-boot-starter-jdbc</artifactId>
<version>2.7.6</version>
</dependency>
</dependencies>
<build>
<plugins>
<plugin>
<groupId>org.springframework.boot</groupId>
<artifactId>spring-boot-maven-plugin</artifactId>
</plugin>
</plugins>
</build>
</project>
|
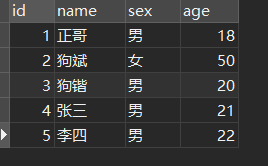
数据库表
创建一个简单的表即可,输入一些内容
实体类
1
2
3
4
5
6
7
8
9
10
| import lombok.Data;
@Data
public class Student {
private int id;
private String name;
private String sex;
private int age;
}
|
lombok插件中的@Data注解可以帮我们生成set、get、构造方法、toString等方法
Java中的类的属性名要和数据库表中的对应,数据库表可以用下划线,Java在编译时会把它用驼峰命名法转换,例如Java中的teacherName对应数据库中的teacher_name
Java中的类属性要和数据库表中的字段对应,数据类型也要对应
| MySQL字段类型 |
Java实体类属性 |
| int、tinyint、smallint、mediumint |
int |
| bigint |
long |
| float |
float |
| double |
double |
| varchar、char、text |
String |
| date |
java.sql.Date |
| time、datetime |
java.sqlTimestamp |
| bit |
boolean |
控制层
1
2
3
4
5
6
7
8
9
10
11
12
13
| @RestController
public class StudentController {
@Autowired
StudentService studentService;
@GetMapping("/api/students")
public Result<List<Student>> getAllStudent() {
List<Student> students = studentService.getAll();
return Result.success(students);
}
}
|
业务层
接口
1
2
3
| public interface StudentService {
List<Student> getAll();
}
|
实现类
1
2
3
4
5
6
7
8
9
10
11
12
13
| @Service
public class StudentServiceImpl implements StudentService {
@Autowired
StudentMapper studentMapper;
@Override
public List<Student> getAll() {
List<Student> students = studentMapper.getAll();
return students;
}
}
|
- 这里的接口不是必须的,但是使用接口能够带来挺多方便
- 在尚未实现具体Service逻辑的情况下编写上层代码,如Controller对Service的调用
- Spring默认是基于动态代理实现AOP的,动态代理需要接口
- 可以对Service进行多实现
- 由于该案例只是简单的实现一下SpringBoot整合MyBatis和SpringMVC,并未在业务层做一些逻辑处理,只是简单获取数据并返回
数据层
1
2
3
4
5
6
7
| @Mapper
@Repository
public interface StudentMapper{
@Select("select * from student")
List<Student> getAll();
}
|
- @Mapper和@Repository都是在持久层的接口上添加注解。
- @Mapper是属于mybatis的注解。在程序中,mybatis需要找到对应的mapper,在编译时候动态生成代理类,实现数据库查询功能
- 但是如果只是单独的使用@Mapper注解的话,在idea中进行自动装配的时候,会出现警告,提示找不到这个bean。但是这个不影响程序运行,可以直接忽略也可以添加@Repository注解。这样spring会扫描@Repository并识别这个bean,就不会出现这个警告。
统一返回结果类
1
2
3
4
5
6
7
8
9
10
11
12
13
14
15
16
17
18
19
20
21
22
23
24
25
26
27
28
| @Data
public class Result<T> implements Serializable {
private Integer code;
private String msg;
private T data;
public static <T> Result<T> success() {
Result<T> result = new Result<T>();
result.code = 1;
return result;
}
public static <T> Result<T> success(T object) {
Result<T> result = new Result<T>();
result.data = object;
result.code = 1;
return result;
}
public static <T> Result<T> error(String msg) {
Result result = new Result();
result.msg = msg;
result.code = 0;
return result;
}
}
|
- Serializable接口:一个对象序列化的接口,一个类只有实现了Serializable接口,它的对象才能被序列化
- 序列化:序列化是将对象状态转换为可保持或传输的格式的过程。与序列化相对的是反序列化,它将流转换为对象。这两个过程结合起来,可以轻松地存储和传输数据
- 把对象转换为字节序列的过程称为对象的序列化、把字节序列恢复为对象的过程称为对象的反序列化
- 这里用的是泛型类,即在声明类时使用泛型
配置文件
application.yml
1
2
3
4
5
6
| spring:
datasource:
driver-class-name: com.mysql.cj.jdbc.Driver
url: jdbc:mysql://localhost:3306/vue?serverTimezone=GMT%2B8&useSSL=true
username: root
password: "020427"
|
application.properties
1
2
3
4
5
6
7
8
|
server.port=8080
spring.thymeleaf.cache=false
mybatis.mapper-locations=classpath:mapper/*.xml
|
- 这里配置了端口号
- mybatis.mapper-locations:用于将配置路径下的*.xml文件加载到mybatis中,这个案例中mapper文件下没有写xml文件,采用的是注解的方法,所以这里可以不用配置
- spring.thymeleaf.cache:Spring Thymeleaf模板引擎的配置属性,用于指定是否启用模板缓存
- true:Thymeleaf会将解析过的模板缓存起来,以提高性能
- false:每次请求都会重新解析模板
启动项目
启动前端项目
在vue项目下用命令行运行启动指令
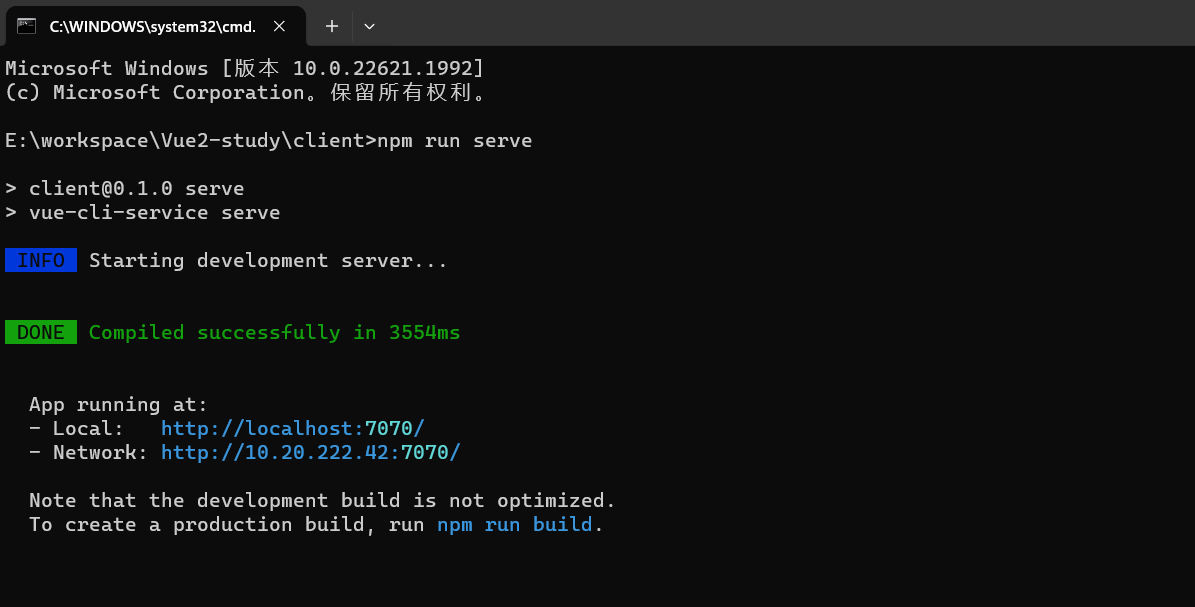
后端正常在启动类启动就行了
最终正常前端从后端获取到了数据并展示在页面中